
- Thu Feb 07, 2008 4:17 pm
#41266
Thought i would write a how-to on refurbishing your brake calipers as i looked for ages for one but could find very little on the subject... Most people seem to simply replace theirs with new or refurbished ones but at £75 a side id rather not  Im doing this on some eg2 rear calipers, these are the same as a lot of other Honda rear calipers, but im guessing the principle will be the same for the fronts. I bought the service kits from
http://www.brakesint.co.uk/
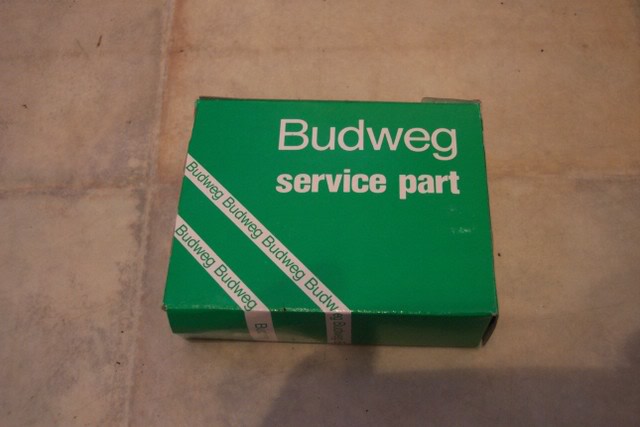
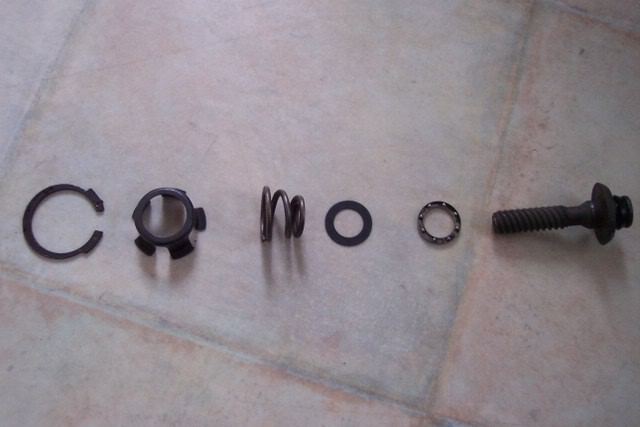
They were only about £15 a side and i would definetaly recommend them as they were very helpful on the phone and i got my stuff the next day. Only thing is im not sure if they ship overseas, perhaps someone will know a similar company in the States...? Anyway, heres what i got in the kit
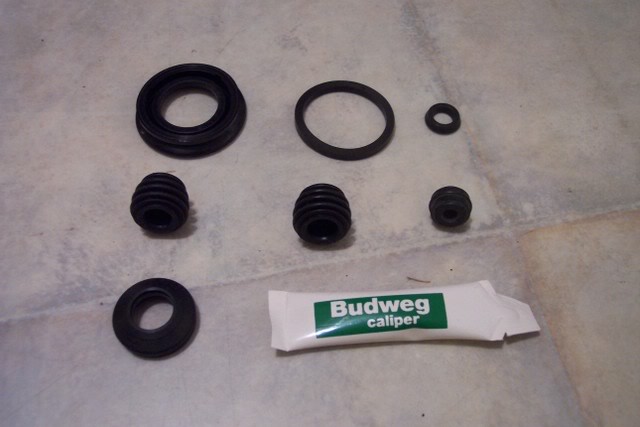
Im not going to list what each part is, but its pretty obvious which one goes where once you've taken the caliper apart. The kit doesnt come with instructions so i was kindof stabbing in the dark but it worked out in the end
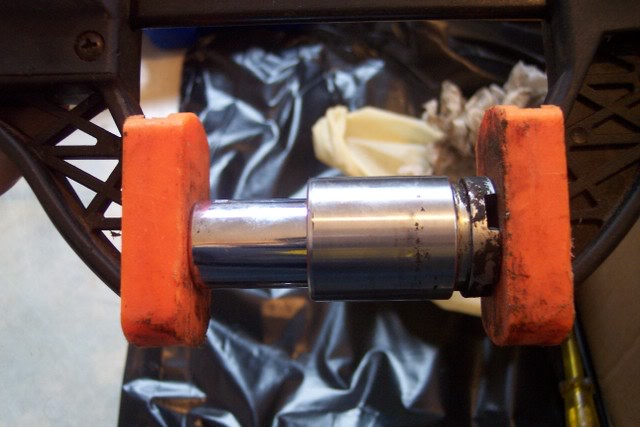
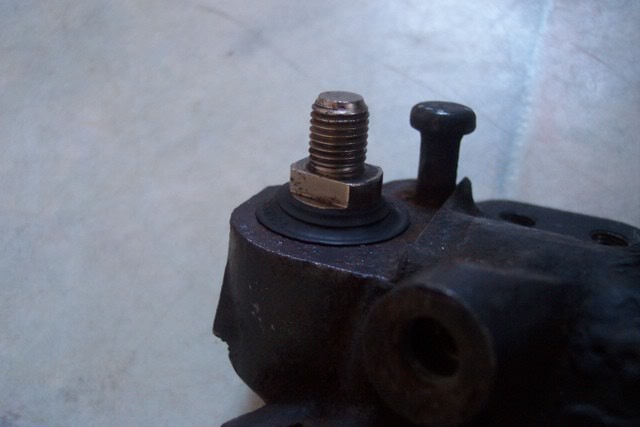
Im going to skip a bit here as you obviousely need to remove the calipers from the car, which is easy peasy. Once you've done that you'll have this
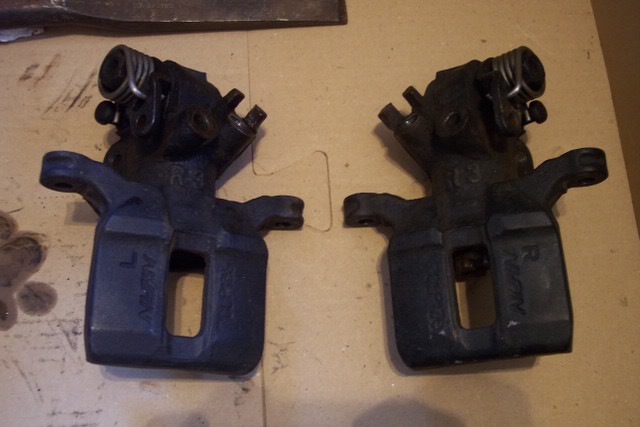
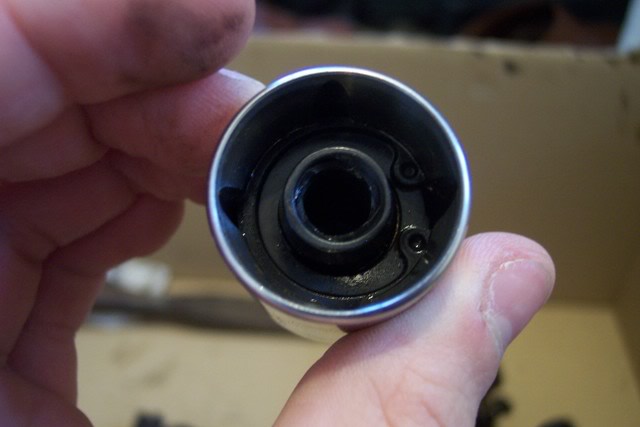
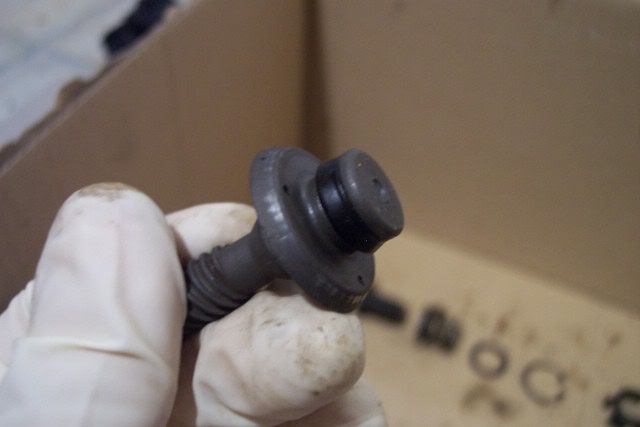
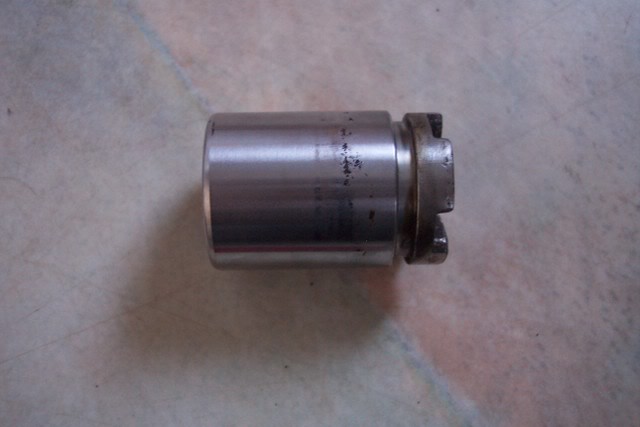
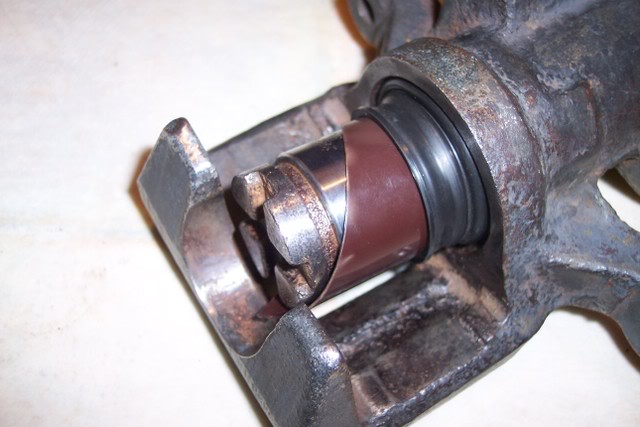
2 lovely broken calipers. To start off, you need to remove the piston. This is the part that pushes the pads against the disc and is on a threaded spline, so you need to twist it to get it out. Heres what it looks like in the caliper
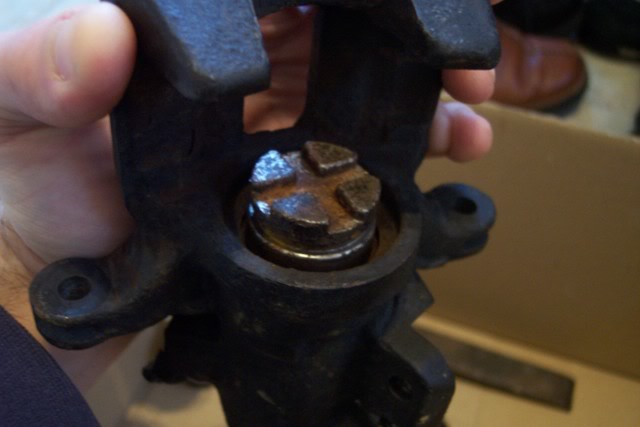
Now here is one of the main problems with mine - no dust cover. Ill show you later on what the side effects of not having one are... Anyway, as you can see the top surface of the piston is in a cross shape. I used a large flat screwdriver to twist it, but it was very stiff. Here is what the piston looks like once you've removed it from the caliper
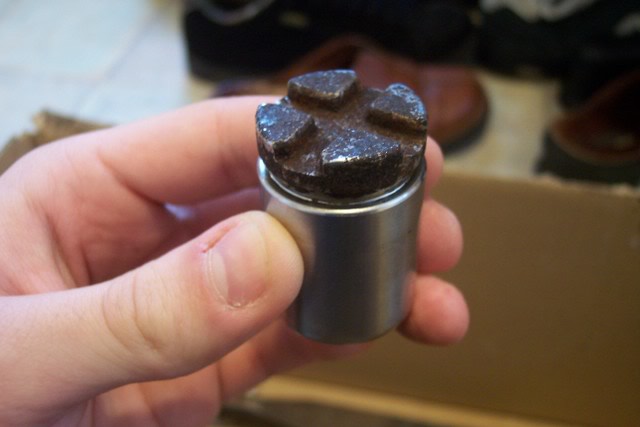
Thats the good side, as you can see the surface im holding is nice and smooth with very very little corrosion. On the other hand, heres the side that i removed from the caliper Which never had the dust cover...
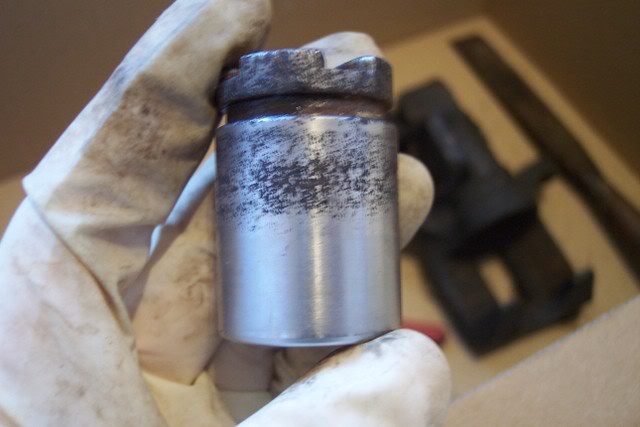
This piston is what you dont want to see - its really no good at all. The surface was very pitted and rough. My only option in this case was to replace the corroded piston, but i picked one up from a scrapyard that was in a lot better condition very cheap. Just out of curiosity, i thought i would take the piston apart to see what was inside, as at this point i had no clue where any of the seals went To get into the piston i used some circlip pliers to remove the circlip seen here
Once the circlip is off, the inner workings just pull out, heres whats inside
And all laid out
And the inside of the piston
Hopefully you can make out the groove in which the circlip sits. Turns out there arent any parts in the piston that were in the service kit, so i just cleaned the parts and put it back together. To do this i slotted the inner bit back in and put the circlip in after it, then used a socket and a clamp to compress the spring and allow the circlip to slot back into the groove
Okay, so now back to the real work! Once the piston is out of the caliper you'll be left with this
As you can see, its absolutely bogging! I started to clean it up using a dremel and a small wire wheel attachment. I didnt want to remove any material from the caliper as that could lead to a poor seal which equals leaks, which i really dont want! The wire wheel worked well though only removing the junk
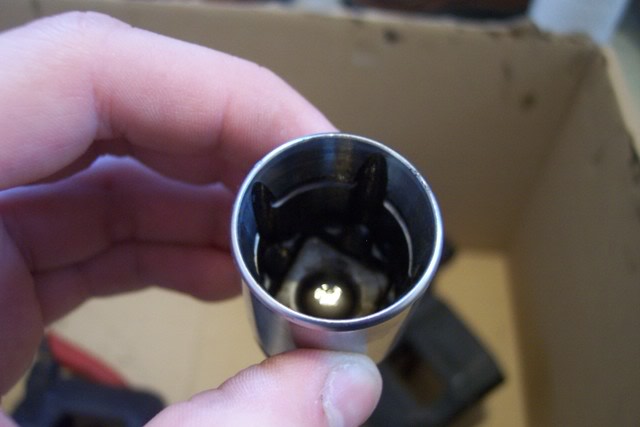
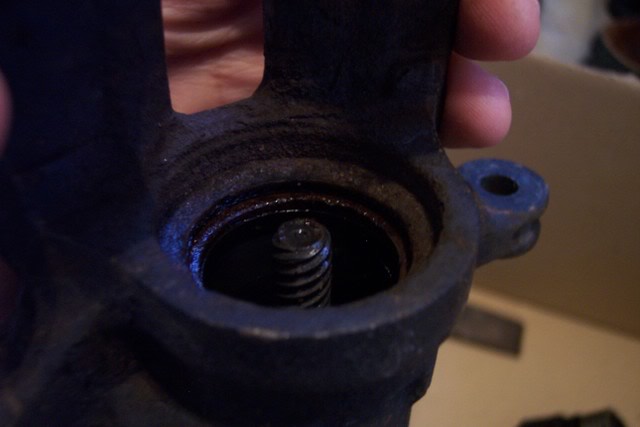
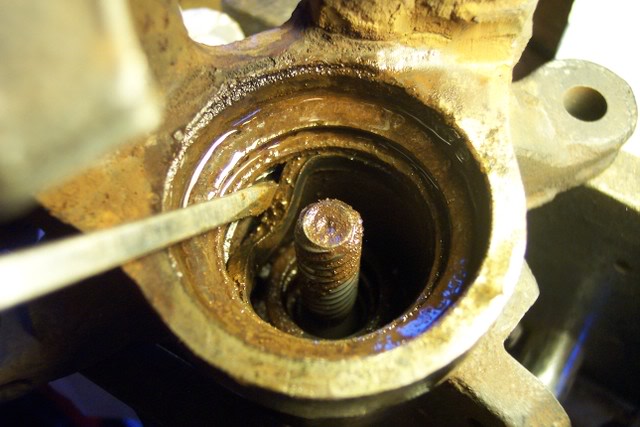
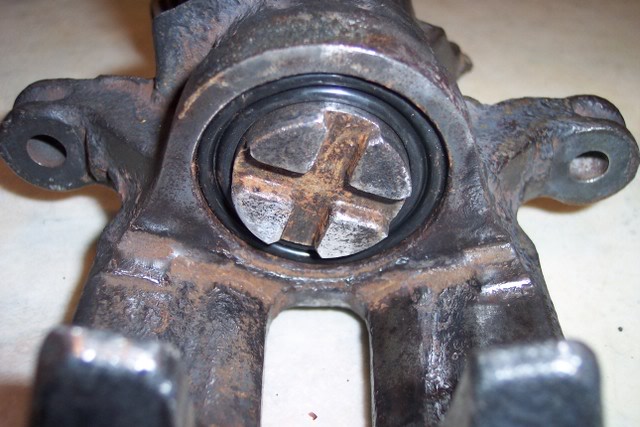
Still a long way to go at this stage but its looking better. In order to get at the insides of the caliper, you need to undo another circlip. This one however is not so easy to get at. Hopefully you can see the 2 holes in the circlip in the bottom left of the cylinder
I had to get new long nose circlip pliers in order to get at them, but even they didnt work. In the end i used a very narrow flat head screwdriver to prise the clip out, being careful not to scratch the surface of the cylinder.
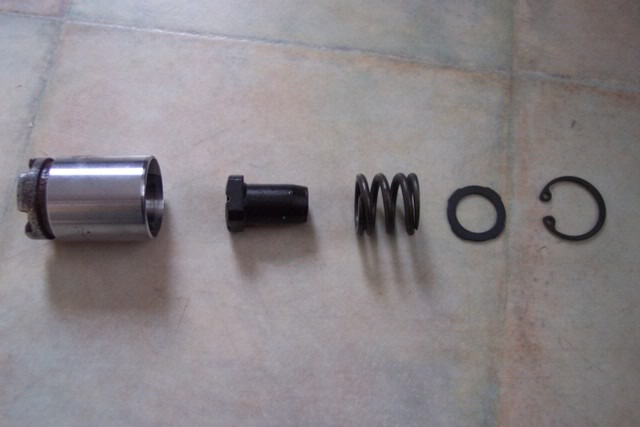
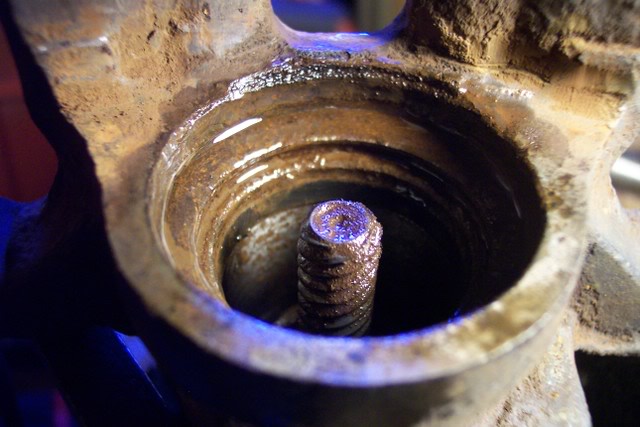
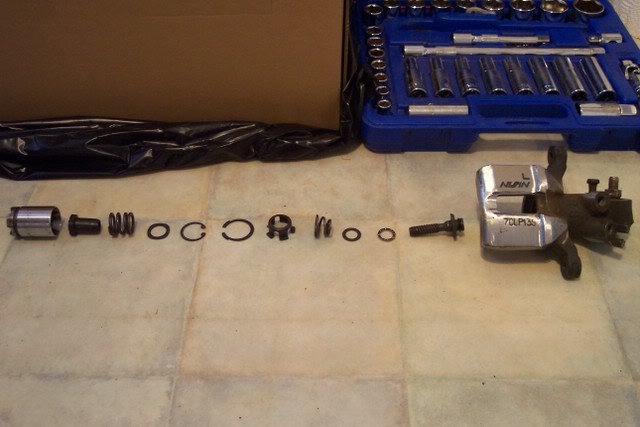
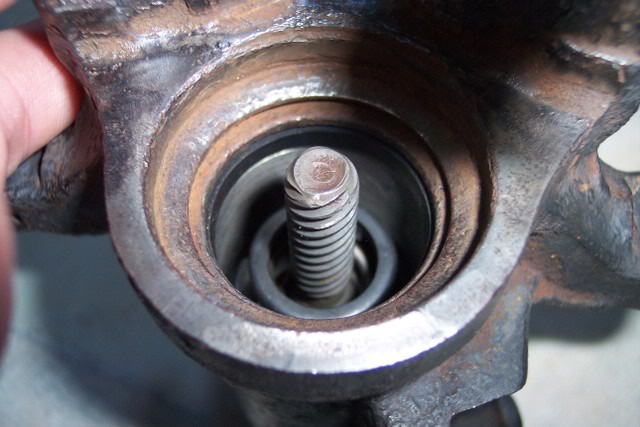
Once the circlip is out, you can simply pull the threaded part out. Theres a few parts on the threaded section so i thought id lay them all out in the order they go back on. Its a good idea to clean all these parts to get rid of any dirt that may have got into the caliper since it was last in bits
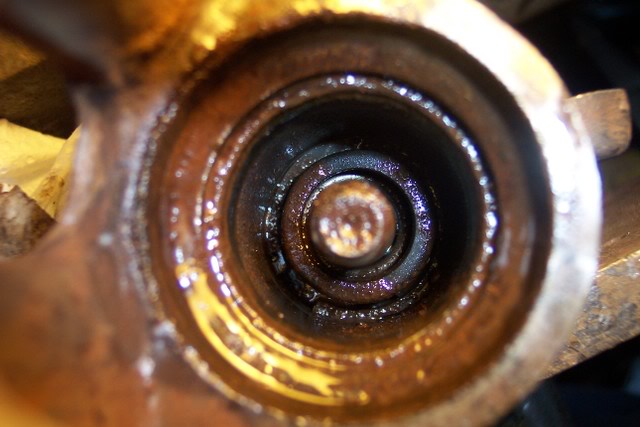
Heres all the parts in the piston and cylinder laid out, a lot more than i was expecting to find!
Righty, first seal i changed was on the threaded part which is the long-ish bit next to the caliper in the above photo. The seal is quite small
You can just pull this one off with your fingers and the new one fits back on just as easily - which is good!
The second seal i removed was one in the caliper, quite near to the top. This one i used a narrow screwdriver to peel off
I then cleaned up all the grooves and where the seal sat with the dremel to try and make sure they're a snug fit and to avoid any leaks. I used a brake and clutch fluid degreaser to flush out all the shavings and dirt. The new seal once again went in without a hitch
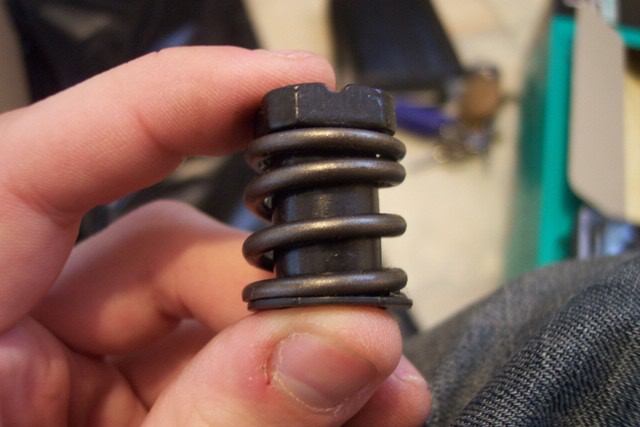
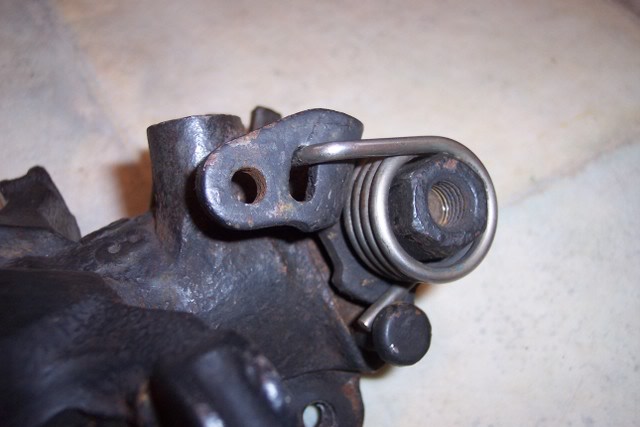
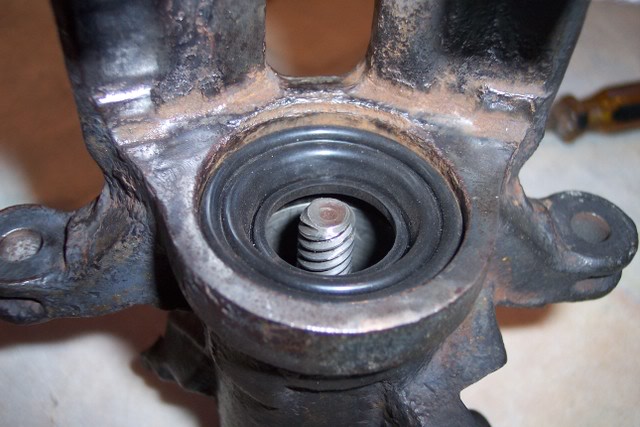
But then things started getting tough... Another seal in the kit is one which is part of the handbrake mechanism. To get at this one, you need to get this spring off which is really easy
The spring off the caliper
As you can see, you're left with a nut, its a 17mm one that you simply undo which leaves you with this

On the spline on the caliper, you might be able to make out the seal we need to replace. This again came off with a screwdriver very easily
At this point, i cleaned up the surface around the seal as it was pretty grubby and again flushed it out with the brake fluid cleaner. Then, i put in the new seal - this was a bit of a pain but determination and patience eventually got it in place
Phew! I then decided to clean up the calipers a bit, grinding away all the pitted parts so that when i paint them i get a good finish. Again, i used the dremel which was ideal for getting into the tight spaces. This is entirely optional, if you're happy with the paint on you calipers then you dont have to bother
After the caliper was ground down, i used the brake fluid cleaner again to flush out all the shavings and clean out the insides of the caliper. Once that had evaporated, it was time to start reassembling the caliper. This is basically the opposite of removal and is dead easy. I refitted the handbrake lever, spring, washer and nut leaving me with this
And then started fitting the parts back into the cylinder, making sure they were in the right order
All the parts back in now they've been cleaned and with the new seals
I then decided to clean up the piston a wee bit, mainly in the groove that the dust cover slots into as i wanted to make sure this is a good seal and as little dirt as possible gets into the caliper. The wire wheel on the dremel worked really well for this part too
Now comes the most difficult part - fitting the dust cover... I had read about this bit being a pain, but i really had no idea just how awkward it was. I first slotted the seal into the caliper, using a tiny amount of soap to allow it to slot in. It took a while and a few attempts but eventually it was all in properly
Now though, you have to get the piston back in... This is very awkward because the seal is such a tight fit - every time i tried, as i peeled the boot over the piston to push it into place the stupid thing would come out of the caliper After a few attempts and some cursing i came up with a way that made things a bit easier...
I took an old rattle can lid and chopped the bottom off, leaving me with a cylindrical bit of quite strong plastic, but importantly it was thin too
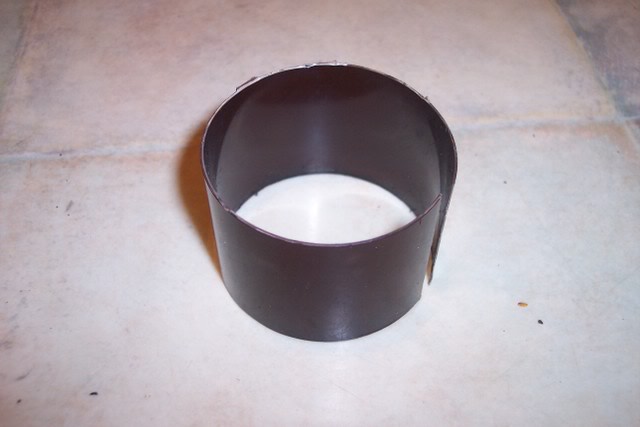
I coiled this up and pushed it into the boot, leaving me with this
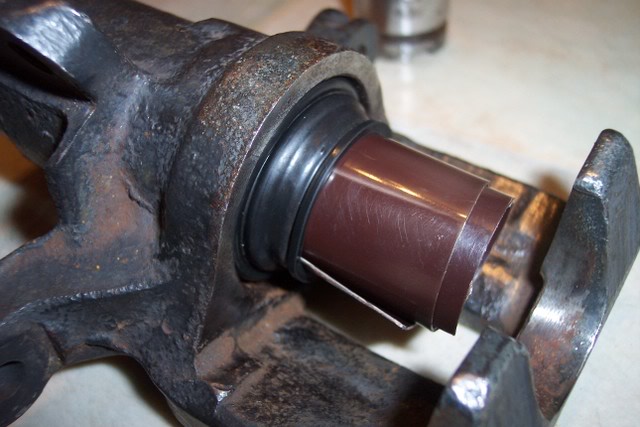
Now, when i pushed the piston into the caliper, the boot slid over it with ease
Once i got to the stage, i had to screw the piston back down into the caliper. This was quite tricky since the rubber was trying to pop out of place, but i took my time and worked away and eventually it was back far enough in the caliper
And thats all the seals in the caliper done!
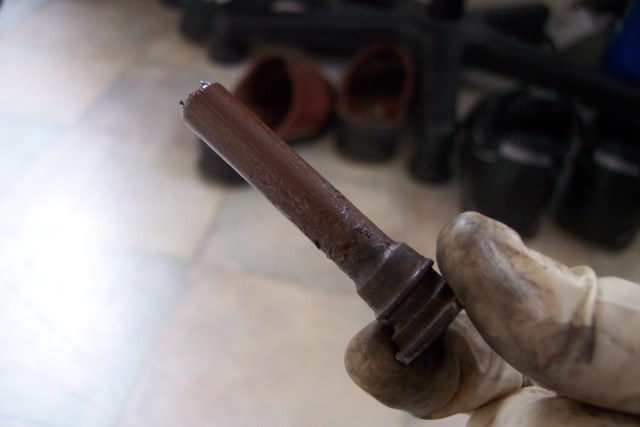
The other parts in the kit are dead easy to fit so once you've got to this stage you've done the most difficult bit Next up i changed the two dust boots on the sliders. Heres what the carrier looked like before i started
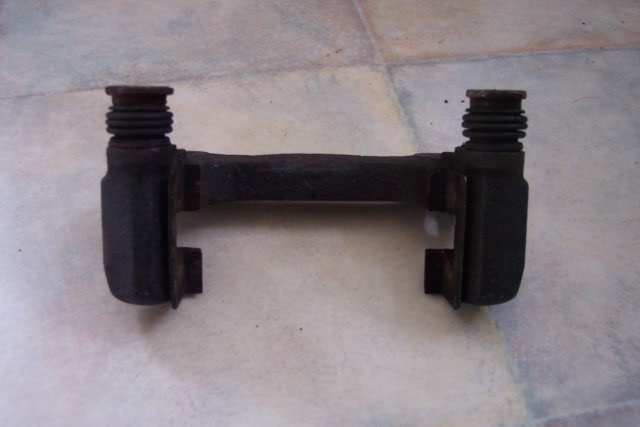
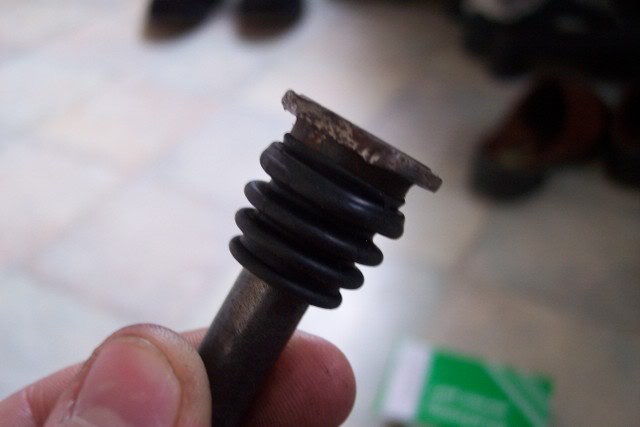
To get the sliders out couldnt be simpler - you just have to pull them. Be aware though that the sliders can sometimes sieze in the carrier in which case its a nightmare to get them out Heres what they look like out of the carrier
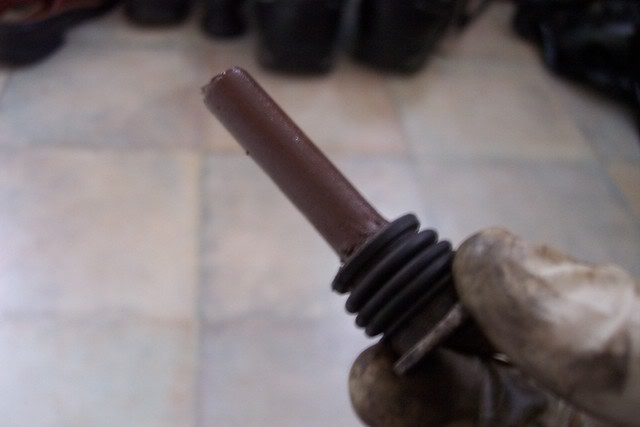
The boot again just pulls off really easily.
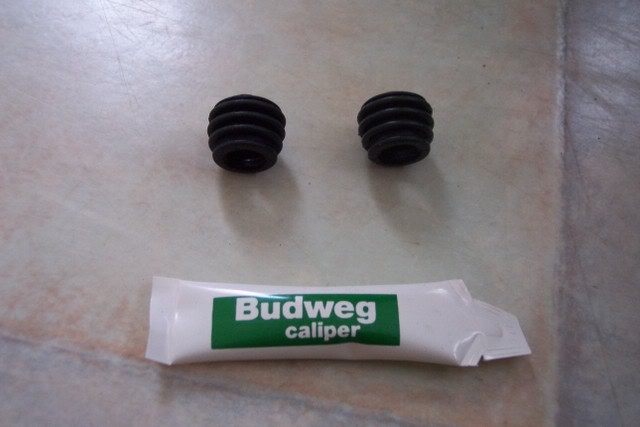
Heres the new boots and the grease that came with the kit
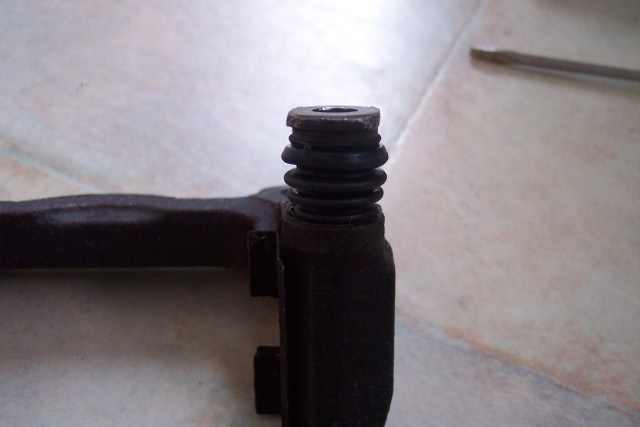
Now things are pretty messy so i cleaned up the slider and also in the cylinder before putting on the new dust boot. You should use the grease provided in the kit to lubricate the sliders as its designed to deal with the high temperatures these parts can reach. So here it is with the new boot on
Once everything is in place and lubricated, just slide it back into the carrier!
And hey presto, thats it done! The only thing left in the kit was a new bleed nipple, which ill put on once the calipers are back on the car and the brakes have been bled At this stage its just a case of painting the calipers (if you want to that is!) and then getting them back on the car, which im sure you are all capable of!
Hope this has all made sense but if you have any questions feel free to PM me and i can try and help
Graham
Im doing this on some eg2 rear calipers, these are the same as a lot of other Honda rear calipers, but im guessing the principle will be the same for the fronts. I bought the service kits fromhttp://www.brakesint.co.uk/
They were only about £15 a side and i would definetaly recommend them as they were very helpful on the phone and i got my stuff the next day. Only thing is im not sure if they ship overseas, perhaps someone will know a similar company in the States...? Anyway, heres what i got in the kit
Im not going to list what each part is, but its pretty obvious which one goes where once you've taken the caliper apart. The kit doesnt come with instructions so i was kindof stabbing in the dark but it worked out in the end
Im going to skip a bit here as you obviousely need to remove the calipers from the car, which is easy peasy. Once you've done that you'll have this
2 lovely broken calipers. To start off, you need to remove the piston. This is the part that pushes the pads against the disc and is on a threaded spline, so you need to twist it to get it out. Heres what it looks like in the caliper
Now here is one of the main problems with mine - no dust cover. Ill show you later on what the side effects of not having one are... Anyway, as you can see the top surface of the piston is in a cross shape. I used a large flat screwdriver to twist it, but it was very stiff. Here is what the piston looks like once you've removed it from the caliper
Thats the good side, as you can see the surface im holding is nice and smooth with very very little corrosion. On the other hand, heres the side that i removed from the caliper Which never had the dust cover...
This piston is what you dont want to see - its really no good at all. The surface was very pitted and rough. My only option in this case was to replace the corroded piston, but i picked one up from a scrapyard that was in a lot better condition very cheap. Just out of curiosity, i thought i would take the piston apart to see what was inside, as at this point i had no clue where any of the seals went
To get into the piston i used some circlip pliers to remove the circlip seen hereOnce the circlip is off, the inner workings just pull out, heres whats inside
And all laid out
And the inside of the piston
Hopefully you can make out the groove in which the circlip sits. Turns out there arent any parts in the piston that were in the service kit, so i just cleaned the parts and put it back together. To do this i slotted the inner bit back in and put the circlip in after it, then used a socket and a clamp to compress the spring and allow the circlip to slot back into the groove
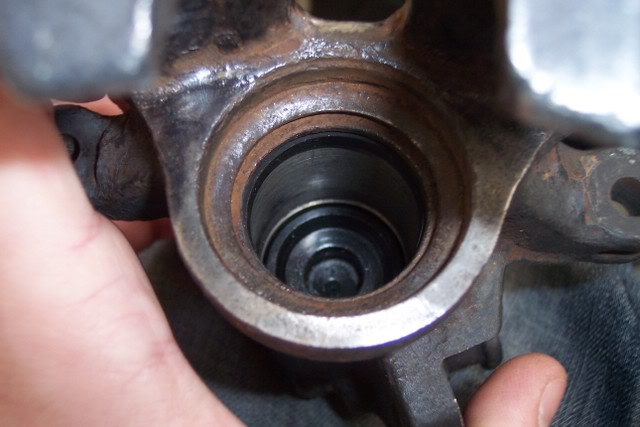
Okay, so now back to the real work! Once the piston is out of the caliper you'll be left with this
As you can see, its absolutely bogging! I started to clean it up using a dremel and a small wire wheel attachment. I didnt want to remove any material from the caliper as that could lead to a poor seal which equals leaks, which i really dont want! The wire wheel worked well though only removing the junk
Still a long way to go at this stage but its looking better. In order to get at the insides of the caliper, you need to undo another circlip. This one however is not so easy to get at. Hopefully you can see the 2 holes in the circlip in the bottom left of the cylinder
I had to get new long nose circlip pliers in order to get at them, but even they didnt work. In the end i used a very narrow flat head screwdriver to prise the clip out, being careful not to scratch the surface of the cylinder.
Once the circlip is out, you can simply pull the threaded part out. Theres a few parts on the threaded section so i thought id lay them all out in the order they go back on. Its a good idea to clean all these parts to get rid of any dirt that may have got into the caliper since it was last in bits
Heres all the parts in the piston and cylinder laid out, a lot more than i was expecting to find!
Righty, first seal i changed was on the threaded part which is the long-ish bit next to the caliper in the above photo. The seal is quite small
You can just pull this one off with your fingers and the new one fits back on just as easily - which is good!
The second seal i removed was one in the caliper, quite near to the top. This one i used a narrow screwdriver to peel off
I then cleaned up all the grooves and where the seal sat with the dremel to try and make sure they're a snug fit and to avoid any leaks. I used a brake and clutch fluid degreaser to flush out all the shavings and dirt. The new seal once again went in without a hitch
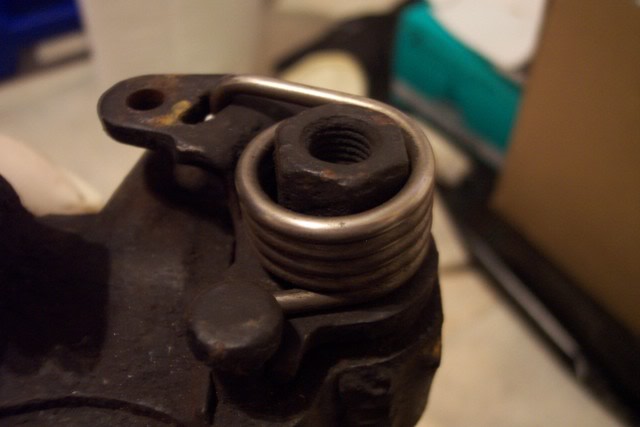
But then things started getting tough... Another seal in the kit is one which is part of the handbrake mechanism. To get at this one, you need to get this spring off which is really easy
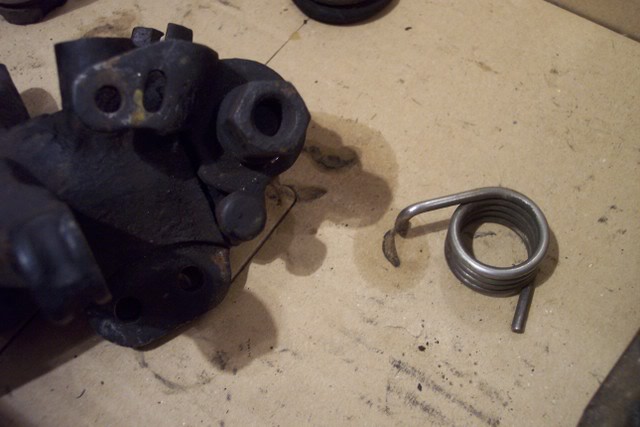
The spring off the caliper
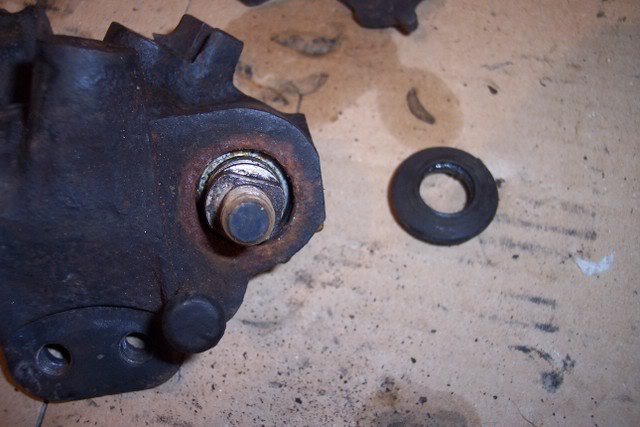
As you can see, you're left with a nut, its a 17mm one that you simply undo which leaves you with this
On the spline on the caliper, you might be able to make out the seal we need to replace. This again came off with a screwdriver very easily
At this point, i cleaned up the surface around the seal as it was pretty grubby and again flushed it out with the brake fluid cleaner. Then, i put in the new seal - this was a bit of a pain but determination and patience eventually got it in place
Phew! I then decided to clean up the calipers a bit, grinding away all the pitted parts so that when i paint them i get a good finish. Again, i used the dremel which was ideal for getting into the tight spaces. This is entirely optional, if you're happy with the paint on you calipers then you dont have to bother
After the caliper was ground down, i used the brake fluid cleaner again to flush out all the shavings and clean out the insides of the caliper. Once that had evaporated, it was time to start reassembling the caliper. This is basically the opposite of removal and is dead easy. I refitted the handbrake lever, spring, washer and nut leaving me with this
And then started fitting the parts back into the cylinder, making sure they were in the right order
All the parts back in now they've been cleaned and with the new seals
I then decided to clean up the piston a wee bit, mainly in the groove that the dust cover slots into as i wanted to make sure this is a good seal and as little dirt as possible gets into the caliper. The wire wheel on the dremel worked really well for this part too
Now comes the most difficult part - fitting the dust cover... I had read about this bit being a pain, but i really had no idea just how awkward it was. I first slotted the seal into the caliper, using a tiny amount of soap to allow it to slot in. It took a while and a few attempts but eventually it was all in properly
Now though, you have to get the piston back in... This is very awkward because the seal is such a tight fit - every time i tried, as i peeled the boot over the piston to push it into place the stupid thing would come out of the caliper
After a few attempts and some cursing i came up with a way that made things a bit easier...I took an old rattle can lid and chopped the bottom off, leaving me with a cylindrical bit of quite strong plastic, but importantly it was thin too
I coiled this up and pushed it into the boot, leaving me with this
Now, when i pushed the piston into the caliper, the boot slid over it with ease
Once i got to the stage, i had to screw the piston back down into the caliper. This was quite tricky since the rubber was trying to pop out of place, but i took my time and worked away and eventually it was back far enough in the caliper
And thats all the seals in the caliper done!
The other parts in the kit are dead easy to fit so once you've got to this stage you've done the most difficult bit
Next up i changed the two dust boots on the sliders. Heres what the carrier looked like before i startedTo get the sliders out couldnt be simpler - you just have to pull them. Be aware though that the sliders can sometimes sieze in the carrier in which case its a nightmare to get them out
Heres what they look like out of the carrierThe boot again just pulls off really easily.
Heres the new boots and the grease that came with the kit
Now things are pretty messy so i cleaned up the slider and also in the cylinder before putting on the new dust boot. You should use the grease provided in the kit to lubricate the sliders as its designed to deal with the high temperatures these parts can reach. So here it is with the new boot on
Once everything is in place and lubricated, just slide it back into the carrier!
And hey presto, thats it done!
The only thing left in the kit was a new bleed nipple, which ill put on once the calipers are back on the car and the brakes have been bled At this stage its just a case of painting the calipers (if you want to that is!) and then getting them back on the car, which im sure you are all capable of!Hope this has all made sense but if you have any questions feel free to PM me and i can try and help
Graham